73 lines
3.3 KiB
Markdown
73 lines
3.3 KiB
Markdown
## transcribe
|
|
|
|
Simple script that uses OpenAI's Whisper to transcribe audio files from your local folders.
|
|
|
|
## Note
|
|
|
|
This implementation and guide is mostly made for researchers not familiar with programming that want a way to transcribe their files locally, without internet connection, usually required within ethical data practices and frameworks. Two examples are shown, a normal workflow with internet connection. And one in which the model is loaded first, via openai-whisper, and then the transcription can be done without being connected to the internet. There is now also a GUI implementation, read below for more information.
|
|
|
|
### Instructions
|
|
|
|
#### Requirements
|
|
|
|
1. This script was made and tested in an Anaconda environment with Python 3.10. I recommend this method if you're not familiar with Python.
|
|
See [here](https://docs.anaconda.com/anaconda/install/index.html) for instructions. You might need administrator rights.
|
|
|
|
2. Whisper requires some additional libraries. The [setup](https://github.com/openai/whisper#setup) page states: "The codebase also depends on a few Python packages, most notably HuggingFace Transformers for their fast tokenizer implementation and ffmpeg-python for reading audio files."
|
|
Users might not need to specifically install Transfomers. However, a conda installation might be needed for ffmpeg[^1], which takes care of setting up PATH variables. From the anaconda prompt, type or copy the following:
|
|
|
|
```
|
|
conda install -c conda-forge ffmpeg-python
|
|
```
|
|
|
|
3. The main functionality comes from openai-whisper. See their [page](https://github.com/openai/whisper) for details. As of 2023-03-22 you can install via:
|
|
|
|
```
|
|
pip install -U openai-whisper
|
|
```
|
|
|
|
4. There is an option to run a batch file, which launches a GUI built on TKinter and TTKthemes. If using these options, make sure they are installed in your Python build. You can install them via pip.
|
|
|
|
```
|
|
pip install tk
|
|
```
|
|
|
|
and
|
|
|
|
```
|
|
pip install ttkthemes
|
|
```
|
|
|
|
#### Using the script
|
|
|
|
This is a simple script with no installation. You can download the zip folder and extract it to your preferred working folder.
|
|
|
|

|
|
|
|
Or by cloning the repository with:
|
|
|
|
```
|
|
git clone https://github.com/soderstromkr/transcribe.git
|
|
```
|
|
|
|
|
|
#### Example with Jupyter Notebook
|
|
|
|
See [example](example.ipynb) for an implementation on Jupyter Notebook, also added an example for a simple [workaround](example_no_internet.ipynb) to transcribe while offline.
|
|
|
|
#### Using the GUI
|
|
|
|
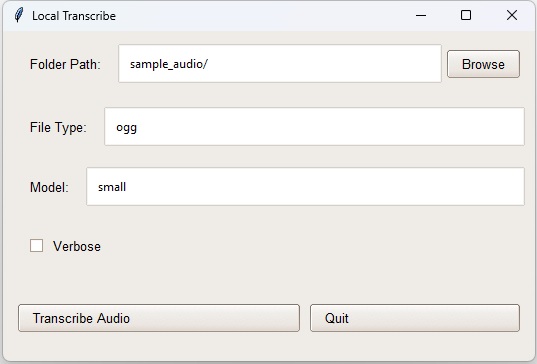
You can also run the GUI version from your terminal running ```python GUI.py``` or with the batch file called run_Windows.bat (for Windows users), just make sure to add your conda path to it. If you want to download a model first, and then go offline for transcription, I recommend running the model with the default sample folder, which will download the model locally.
|
|
|
|
The GUI should look like this:
|
|
|
|
|
|
|
|
or this, on a Mac, by running `python GUI.py` or `python3 GUI.py`:
|
|
|
|

|
|
|
|
[^1]: Advanced users can use ```pip install ffmpeg-python``` but be ready to deal with some [PATH issues](https://stackoverflow.com/questions/65836756/python-ffmpeg-wont-accept-path-why), which I encountered in Windows 11.
|
|
|
|
[](https://zenodo.org/badge/latestdoi/617404576)
|